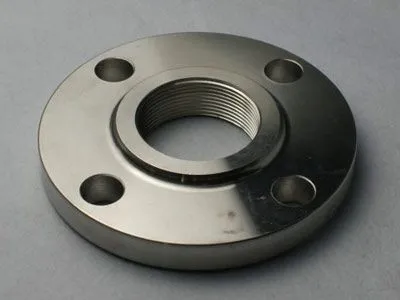
Hey there! As a flanges supplier, I've seen firsthand how crucial it is to tighten flange bolts properly. It's not just about getting the job done; it's about ensuring safety, preventing leaks, and making sure your equipment runs smoothly. In this blog, I'll share some tips and tricks on how to do it right.
Why Proper Bolt Tightening Matters
Before we dive into the how-to, let's talk about why proper bolt tightening is so important. When you're dealing with flanges, you're essentially creating a seal between two pipes or components. If the bolts aren't tightened correctly, that seal can fail, leading to leaks. And leaks can be a huge problem, especially in industries where safety and efficiency are top priorities.
Leaking fluids or gases can cause environmental damage, pose a safety risk to workers, and even lead to costly downtime. Plus, if you're in a regulated industry, failing to maintain a proper seal could result in fines or other penalties. So, it's definitely worth taking the time to get it right.
Tools You'll Need
To tighten flange bolts properly, you'll need the right tools. Here's a list of the essentials:
- Torque Wrench: This is the most important tool for the job. A torque wrench allows you to apply a specific amount of force to the bolts, ensuring that they're tightened to the correct specification. Make sure you choose a torque wrench that's appropriate for the size and type of bolts you're working with.
- Socket Set: You'll need a set of sockets to fit the bolts on your flanges. Make sure you have the right size sockets for the job, and that they're in good condition.
- Thread Lubricant: Using a thread lubricant can help reduce friction and ensure that the bolts are tightened evenly. Choose a lubricant that's appropriate for the type of bolts and the environment you're working in.
- Safety Gear: Always wear appropriate safety gear when working with flanges and bolts. This includes safety glasses, gloves, and a hard hat.
Step-by-Step Guide to Tightening Flange Bolts
Now that you have the right tools, it's time to get to work. Here's a step-by-step guide to tightening flange bolts properly:
Step 1: Prepare the Flanges
Before you start tightening the bolts, make sure the flanges are clean and free of debris. Any dirt, rust, or other contaminants can affect the seal and cause leaks. Use a wire brush or other cleaning tool to remove any debris from the flange surfaces.
Step 2: Install the Gasket
Next, install the gasket between the two flanges. Make sure the gasket is centered and aligned properly, and that it's the correct size and type for the application. The gasket should be compressed evenly when the bolts are tightened, creating a seal between the flanges.
Step 3: Insert the Bolts
Insert the bolts through the holes in the flanges, making sure they're threaded all the way through. Use a socket wrench to hand-tighten the bolts until they're snug, but don't over-tighten them at this stage.
Step 4: Apply Thread Lubricant
Apply a small amount of thread lubricant to the threads of the bolts. This will help reduce friction and ensure that the bolts are tightened evenly.
Step 5: Tighten the Bolts in a Pattern
To ensure that the bolts are tightened evenly, it's important to follow a specific tightening pattern. There are several different patterns you can use, but the most common is the star pattern. Start by tightening the bolts in the center of the flange, then work your way out in a star pattern, tightening the bolts in a diagonal sequence.
Use the torque wrench to tighten the bolts to the specified torque value. Make sure you apply the torque evenly and slowly, and that you don't over-tighten the bolts. Over-tightening can cause the bolts to stretch or break, which can lead to leaks and other problems.
Step 6: Check the Torque
After you've tightened all the bolts, use the torque wrench to check the torque on each bolt. Make sure the torque is within the specified range, and that all the bolts are tightened evenly. If any of the bolts are loose, tighten them to the correct torque value.
Step 7: Recheck the Torque
Once you've completed the initial tightening, it's a good idea to recheck the torque after a period of time. This will help ensure that the bolts haven't loosened due to vibration or other factors. Recheck the torque after 24 hours, and then again after a few weeks.
Types of Flanges and Their Bolt Tightening Requirements
Different types of flanges have different bolt tightening requirements. Here's a brief overview of some of the most common types of flanges and their specific requirements:
- Socket Welding Flange: Socket welding flanges are typically used in high-pressure applications. They require a specific torque value to ensure a proper seal. Make sure you follow the manufacturer's recommendations for tightening the bolts on socket welding flanges.
- Long Welding Neck Flange: Long welding neck flanges are commonly used in pipelines and other applications where a strong, reliable connection is required. They also require a specific torque value to ensure a proper seal. Follow the manufacturer's recommendations for tightening the bolts on long welding neck flanges.
- Blind Flange: Blind flanges are used to close off the end of a pipe or other component. They require a specific torque value to ensure a proper seal. Make sure you follow the manufacturer's recommendations for tightening the bolts on blind flanges.
Common Mistakes to Avoid
When tightening flange bolts, there are several common mistakes that you should avoid. Here are some of the most important ones:
- Over-Tightening: Over-tightening the bolts can cause them to stretch or break, which can lead to leaks and other problems. Make sure you use a torque wrench and follow the specified torque value.
- Under-Tightening: Under-tightening the bolts can also cause leaks. Make sure you tighten the bolts to the specified torque value, and that you recheck the torque after a period of time.
- Uneven Tightening: If the bolts aren't tightened evenly, it can cause the flange to warp or distort, which can lead to leaks. Make sure you follow a specific tightening pattern and use a torque wrench to ensure that the bolts are tightened evenly.
- Using the Wrong Tools: Using the wrong tools can make the job more difficult and can also lead to mistakes. Make sure you use a torque wrench, socket set, and other tools that are appropriate for the size and type of bolts you're working with.
Conclusion
Tightening flange bolts properly is an important part of maintaining a safe and reliable piping system. By following the tips and tricks outlined in this blog, you can ensure that your flanges are tightened correctly and that your equipment runs smoothly.
If you're in the market for high-quality flanges, look no further! As a trusted flanges supplier, we offer a wide range of flanges to meet your needs. Whether you need Socket Welding Flanges, Long Welding Neck Flanges, or Blind Flanges, we've got you covered.
Contact us today to discuss your flange requirements and get a quote. We're here to help you find the right flanges for your application and ensure that you get the best possible service.


References
- ASME B16.5 - Pipe Flanges and Flanged Fittings
- API 6A - Specification for Wellhead and Christmas Tree Equipment
- ISO 7005 - Metallic Flanges for General Use