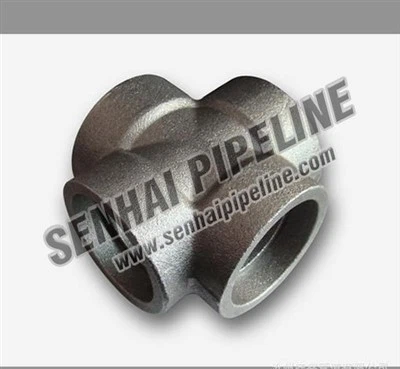
Installing a Pipe Fittings Cross in an oil and gas pipeline is a meticulous process that demands precision, expertise, and adherence to industry standards. As a reputable Pipe Fittings Cross supplier, I understand the critical role these components play in ensuring the integrity and efficiency of oil and gas pipelines. In this blog post, I will guide you through the step-by-step process of installing a Pipe Fittings Cross, highlighting key considerations and best practices along the way.
Pre-Installation Preparations
Before embarking on the installation process, it is essential to conduct thorough preparations to ensure a smooth and successful installation. Here are the key steps to take:
1. Review the Pipeline Design
Carefully review the pipeline design specifications to ensure that the Pipe Fittings Cross is the correct size, material, and pressure rating for the application. Verify that the cross is compatible with the existing pipeline system and meets all relevant industry standards and codes.
2. Inspect the Pipe Fittings Cross
Inspect the Pipe Fittings Cross for any damage, defects, or irregularities before installation. Check the dimensions, surface finish, and weld quality to ensure that the cross meets the required specifications. If any issues are identified, contact the supplier immediately for replacement or repair.
3. Gather the Necessary Tools and Equipment
Collect all the tools and equipment required for the installation, including welding machines, cutting tools, measuring instruments, and safety gear. Ensure that all tools are in good working condition and properly calibrated.
4. Prepare the Pipeline
Clean the pipeline surfaces where the Pipe Fittings Cross will be installed to remove any dirt, debris, or rust. Use a wire brush or sandpaper to achieve a clean and smooth surface. Measure and mark the location for the cross on the pipeline, ensuring that it is aligned correctly with the existing pipeline system.
Installation Process
Once the pre-installation preparations are complete, you can proceed with the installation of the Pipe Fittings Cross. Here is a step-by-step guide to the installation process:
1. Cut the Pipeline
Using a cutting tool, carefully cut the pipeline at the marked location to create an opening for the Pipe Fittings Cross. Ensure that the cut is straight and perpendicular to the pipeline axis. Remove any burrs or sharp edges from the cut surfaces.
2. Fit the Pipe Fittings Cross
Insert the Pipe Fittings Cross into the opening in the pipeline, ensuring that it is properly aligned with the existing pipeline system. Use a measuring instrument to check the alignment and ensure that the cross is centered and level.
3. Weld the Pipe Fittings Cross
Weld the Pipe Fittings Cross to the pipeline using a suitable welding process, such as shielded metal arc welding (SMAW), gas tungsten arc welding (GTAW), or gas metal arc welding (GMAW). Follow the welding procedure specification (WPS) provided by the manufacturer to ensure a high-quality weld.


4. Inspect the Weld
After welding, inspect the weld for any defects, such as cracks, porosity, or incomplete fusion. Use non-destructive testing methods, such as ultrasonic testing (UT), radiographic testing (RT), or magnetic particle testing (MT), to detect any hidden defects. If any defects are found, repair the weld immediately.
5. Pressure Test the Pipeline
Once the weld has been inspected and approved, pressure test the pipeline to ensure its integrity. Use a pressure testing pump to gradually increase the pressure in the pipeline to the required test pressure. Hold the pressure for a specified period of time and monitor for any leaks or pressure drops. If any leaks are detected, repair them immediately and repeat the pressure test.
Post-Installation Considerations
After the installation of the Pipe Fittings Cross is complete, there are several post-installation considerations to keep in mind:
1. Clean and Paint the Pipeline
Clean the pipeline surfaces to remove any welding spatter, slag, or other debris. Apply a suitable paint or coating to the pipeline to protect it from corrosion and environmental damage.
2. Document the Installation
Keep detailed records of the installation process, including the date, time, location, welding parameters, and test results. This documentation will be useful for future reference and maintenance.
3. Conduct Regular Inspections
Regularly inspect the Pipe Fittings Cross and the surrounding pipeline system for any signs of damage, corrosion, or leakage. Perform preventive maintenance tasks, such as cleaning, painting, and tightening bolts, as needed.
4. Follow Safety Procedures
Always follow safety procedures when working with oil and gas pipelines. Wear appropriate safety gear, such as gloves, goggles, and hard hats, and use caution when handling tools and equipment.
Related Pipe Fittings
In addition to Pipe Fittings Cross, there are several other types of pipe fittings that are commonly used in oil and gas pipelines. These include Carbon Steel Tee, Carbon Steel Caps, and Hot Induction Bends. These fittings play a crucial role in ensuring the proper flow and distribution of oil and gas in the pipeline system.
Conclusion
Installing a Pipe Fittings Cross in an oil and gas pipeline is a complex process that requires careful planning, preparation, and execution. By following the steps outlined in this blog post and adhering to industry standards and best practices, you can ensure a successful installation and a reliable pipeline system. As a Pipe Fittings Cross supplier, I am committed to providing high-quality products and excellent customer service. If you have any questions or need assistance with your pipe fitting needs, please do not hesitate to contact me. I look forward to working with you to meet your requirements.
References
- American Petroleum Institute (API) Standards
- American Society of Mechanical Engineers (ASME) Codes
- Pipeline Safety Regulations